TLDR: WordPress site migration sounds scary, but with the right process it’s straightforward. I’ll walk you through manual migration, plugin-based migration, and what to do when things go wrong. This is the exact process I use on every site move.
Migrating a WordPress site is one of those tasks that, done badly, turns into a nightmare broken links, lost emails, messed-up databases, and confused clients. Done correctly, it’s about 45 minutes of careful work that results in a clean move with zero downtime.
I’ve migrated hundreds of WordPress sites. Here’s the process I follow every single time.
Before You Start: Essential Preparation
Before touching anything, take a full backup of your existing site. Files and database. Use UpdraftPlus to create a fresh backup and download a local copy to your computer. This is your insurance policy if everything goes wrong, you can restore from it.
Also, lower the DNS TTL (Time to Live) of your domain to 300 seconds (5 minutes) at your domain registrar or DNS provider at least 24 hours before the migration. This means that when you change your DNS later, the change propagates globally within minutes rather than hours.
Method 1: Using a Migration Plugin
Duplicator My Go-To for Most Migrations
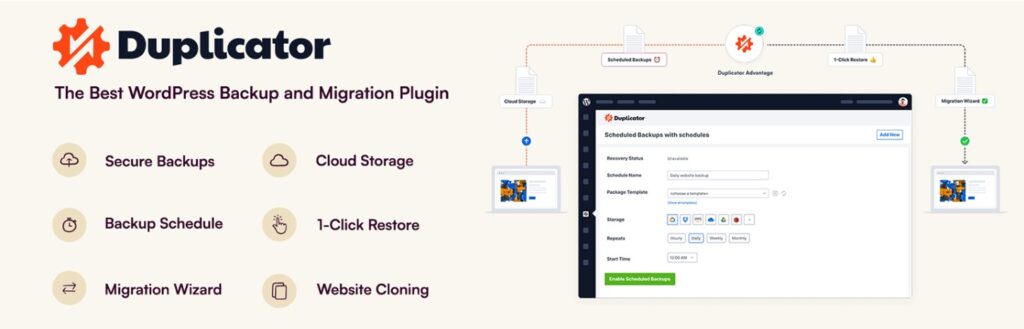
Duplicator creates a portable package of your entire WordPress site files and database that can be deployed to any new server or hosting environment. The free version handles standard migrations. Duplicator Pro adds large site support (over 500MB), cloud storage integration, and scheduled migration packages.
Here’s the process: install and run Duplicator on your existing site to create a package (a zip archive plus an installer script). Download both files. Upload them to your new hosting account. Run the installer by visiting the installer.php file in your browser. Follow the wizard, which sets up the database connection and updates site URLs automatically.
All-in-One WP Migration The Simplest Option

All-in-One WP Migration is probably the most beginner-friendly migration plugin available. You export your site from the original host in a .wpress file, install the plugin on the new host, and import the file. It handles URL replacement, database import, and file transfer automatically.
The limitation: the free version has a 512MB import limit, which many real-world sites exceed. The Unlimited extension removes this limit but costs around $69 worth it for a one-time migration.
UpdraftPlus Migrator

If you’re already using UpdraftPlus for backups, the Migrator extension (included in UpdraftPlus Premium) lets you clone or move a site directly between servers without manual file handling. It’s particularly convenient when you’re already in the UpdraftPlus workflow.
Method 2: Manual Migration For Full Control
Manual migration gives you complete transparency and is my preferred method for complex sites. Here’s how it works:
Step 1: Export the Database
Access phpMyAdmin on your current host, select your WordPress database, and export it as a SQL file. This file contains all your content, settings, and user data.
Step 2: Download All WordPress Files
Connect to your current host via FTP using FileZilla or a similar client. Download your entire WordPress installation the wp-content folder (themes, plugins, uploads), your wp-config.php file, and the root WordPress files.
Step 3: Set Up WordPress on the New Host
Use your new host’s one-click installer to install a fresh copy of WordPress on the new server. Then, replace the wp-content folder with the one you downloaded. Upload your downloaded SQL file and import it via phpMyAdmin on the new host.
Step 4: Update wp-config.php
Edit the wp-config.php file on the new server with the correct database name, database username, database password, and database host for the new hosting environment. These credentials come from your new host’s dashboard.
Step 5: Search and Replace
Your database contains hardcoded references to your old site URL. Use the WP CLI command ‘wp search-replace’ or install the Better Search Replace plugin to update all instances of your old domain to the new domain or temporary URL. This step is critical missing it causes broken images, missing stylesheets, and redirect loops.
Testing Before Going Live
Before updating DNS, test your new site using a hosts file modification or a temporary URL provided by your host. Check that your homepage, key pages, blog posts, contact forms, checkout flow (for WooCommerce), and admin dashboard all work correctly.
Test on mobile, check that images load, confirm that SSL is properly configured on the new host, and verify that your email addresses function if your domain has associated email hosting.
Updating DNS and Going Live
Once you’re confident everything works, update your domain’s DNS A record to point to your new host’s IP address. Because you lowered the TTL earlier, propagation will complete within minutes rather than hours. Monitor your site for the next 24 hours and check Google Search Console for any crawl errors that might indicate migration issues.
In addition, set up 301 redirects for any URLs that changed during the migration to preserve your SEO equity and prevent broken links for existing visitors.
To summarize, WordPress migration is a predictable process when you follow the right steps. Backup first, use a migration plugin for simplicity or manual method for full control, test thoroughly before going live, and update DNS only when you’re confident everything works. The 45 minutes you invest doing it properly saves you from hours of troubleshooting afterward.